
Before we get started, if you’re new to this series, it’s worth going back and reviewing the previous entries before continuing, as each builds on the last. To recap briefly, Part 1 is about creating a development environment, Part 2 covers table structures and rows, Part 3 and Part 4 show you how to build federated scenarios, and Part 5 discusses calculation views. Once you’ve checked back and followed all the steps in the series so far, you’ll be ready to work through this final article in the series.
We’re completing our SAP HANA series with an exploration of analytic privileges—covering general security and how to practically apply analytic privileges to restrict the data a user sees from the created models in your workspace.
1. Analytic Privileges
Analytic privileges grant different users access to different portions of data in the same view, based on their business role. Within the definition of an analytic privilege, the conditions that control which data users see are defined using SQL.
The first step is to create a new analytic privilege, to do that create a new SAP HANA database artifact and select ‘Analytic Privilege’ in the corresponding section.
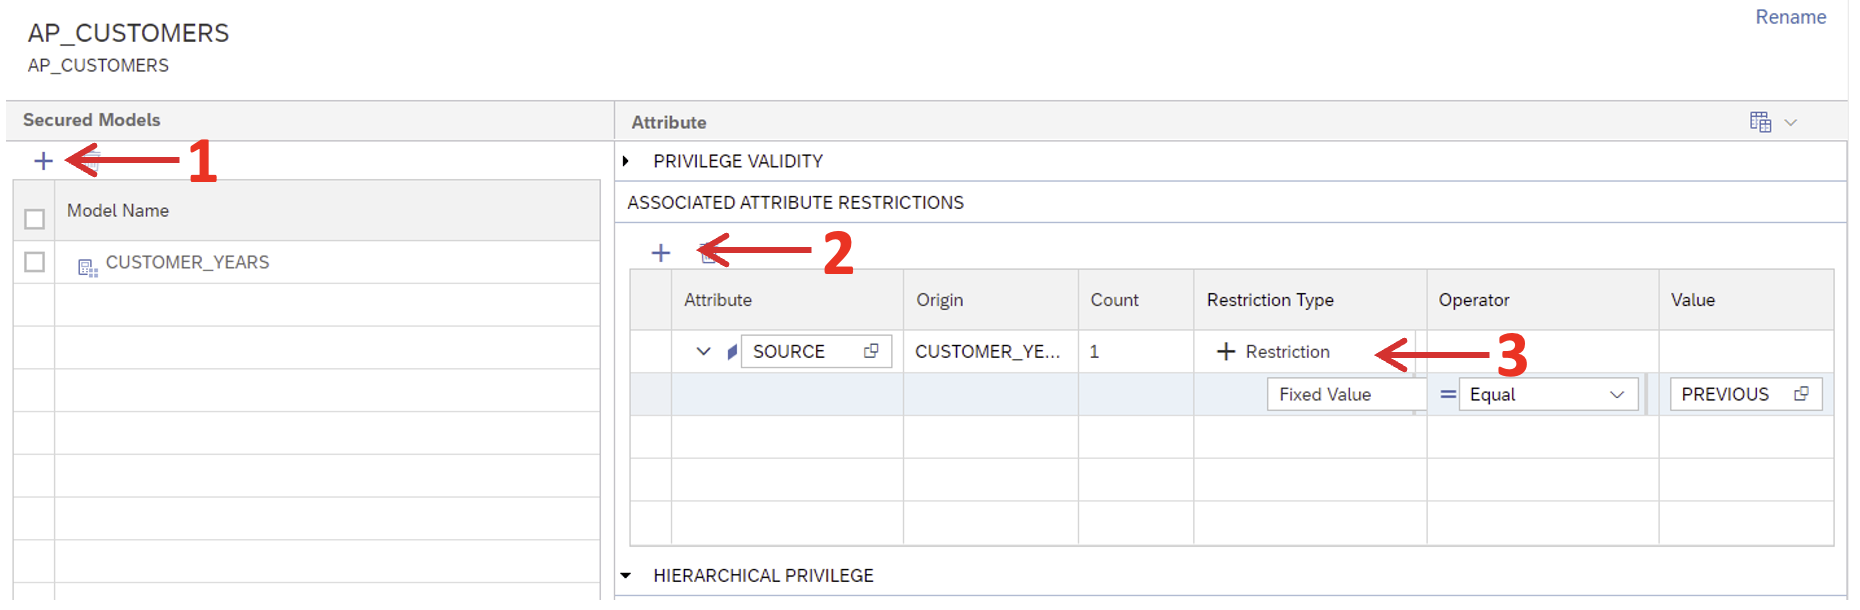
When the object has been created, open it and add the model you want to apply. In our case, it will be the calculation view ‘CUSTOMER_YEARS’. Select the column ‘SOURCE’ as an attribute restriction and add the restriction under the Restriction Type column, as shown here:
Next, we need to assign this type of security to the calculation view. Open the view, and in the semantics node go to ‘View Properties’ > ‘General’ and then in the ‘Apply Privileges’ section select ‘SQL Analytic Privileges’ and build it as follows:

Once this deployment has been completed correctly, we can also deploy the analytic privilege file. To test if the procedure works correctly, try to perform a data preview on top of the calculation view. If everything is correct it will show an error like the following:

To fix this error, we have to assign this analytic privilege to a role and that will in turn allow us to assign it to a user.
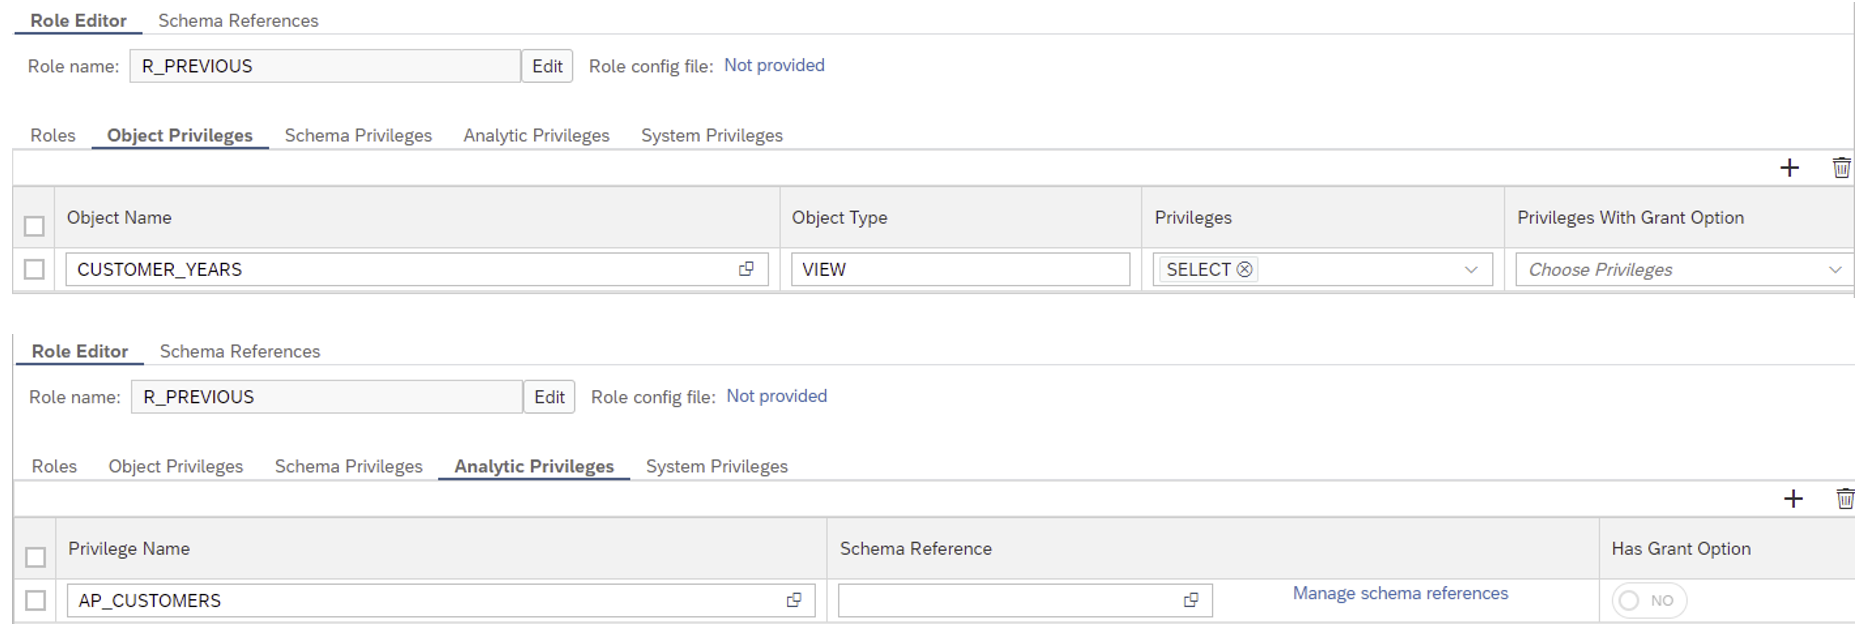
To do so, create a role as a database artifact and copy the following configuration. Note that the role file has 2 definitions, one as an ‘Object Privilege’ and another as ‘Analytic Privileges’, make sure to declare both in the same artifact and then deploy it, as shown here:
Now we can assign the role to a user. This user will have permission to select on the calculation view and to see any data tagged with ‘PREVIOUS’. Go to the database explorer and open a new SQL Console with the admin user. In this example, the user is DBADMIN and was defined during the creation of the project.
The lines below create a user and assign it to the role:
CREATE USER U_PREVIOUS PASSWORD “<password>” NO FORCE_FIRST_PASSWORD_CHANGE SET USERGROUP DEFAULT;
GRANT HANACLOUD_HDI_DB_1."R_PREVIOUS" TO U_PREVIOUS;
Let’s connect to the new user and execute a select to the calculation view:
CONNECT U_PREVIOUS PASSWORD "<password>" SELECT * FROM "HANACLOUD_HDI_DB_1"."CUSTOMER_YEARS"

Note that although there is also data from 2022 in the dataset, the output only displays the historic data. This demonstrates to us that the security settings we put in place are working as expected. By following the steps explained in this section, you are now able to create and configure security to restrict the data that individual users can see.
2. Apply privileges to the application user
So, at this point, we’ve seen how to permit users to access some parts of the data. Now we will explore how to give application users access to all the data—using a slightly different mechanism.
To do this, create a new analytic privilege as described above, add the calculation view you want to secure, and don’t add any restrictions (if there are no restrictions, you can see all available data).

Assigning this to a technical user requires a special mechanism. Create a new folder under ‘src’ named ‘defaults’ and create a new role named ‘development_debug_role’. Open it and define as ‘Analytic Privileges’ the analytic privilege we have just created and, finally, build it, as shown here.

Note that there are no ‘Object Privileges’ as the application user already has select privileges in the container by default.
The last step needed is to adjust the file ‘package.json’ making the following change in line 7 and deploying the entire project:


You can just copy the whole section of code to your package.json file. However, the most secure way is to adjust the file as stated in the previous steps. In case copying the whole section of code does not work for you, you may need to adjust "^4.*" and change it to "^3.*" for the file to work.
NB: Remember that the folder ‘default’ and the role inside ‘development_debug_role’ have to be created with the same name and used exactly like in this guide to work.
At this point, you can perform a data preview of the calculation view from the workspace, and you will be able to retrieve all of the data contained in it:

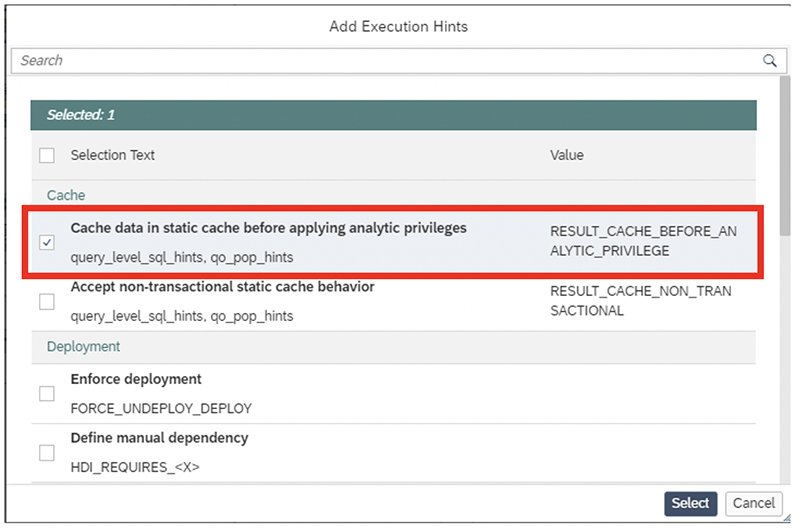
The last step is to adjust the view to create cache entries before analytic privileges are applied. For this, open the semantics node of the calculation view again, go to ‘View Properties’ > ‘Advanced’ > ‘Add Execution Hints’ and select ‘Cache data in static cache before applying analytic privileges’, as shown here:

With this last step, we have ensured that the cache is still maintained, and therefore we have also maintained the performance of the model while the security is applied.
3. Conclusions
To sum up, in today’s article we’ve explained how to apply the necessary security settings depending on the user accessing the model, from a regular user to an application user. And we’ve achieved all of these steps without negatively impacting the performance of the model. So, if you’ve followed the guide up to this point you should now be able to state the security of any model in any situation.
And if you’ve followed the series so far, you should be able to manage an end-to-end project, from the creation of the environment through to the security and performance review. We hope you’ve found our SAP HANA series useful. If you need to go back and revisit one of the previous articles in the series, you’ll find some useful links below. And in the meantime, don’t forget to keep an eye on our blog for more useful news and guidance.
Previous posts in this series:
SAP HANA Cloud Series Part 1 – How to Set Up the Environment
SAP HANA Cloud Series Part 2 – How to Define Tables and Roles
SAP HANA Cloud Series Part 3 – How to Build Up a Federated Scenario (I)
SAP HANA Cloud Series Part 4 – How to Build Up a Federated Scenario (II)
SAP HANA Cloud Series Part 5 – How to Improve Calculation Views