
If you’ve been following our SAP HANA series so far, in Part 1 you will have learned how to create a development environment, in Part 2 you’ll have learned how to define table structures and rows, and in Part 3 you’ll have started learning about building a federated scenario.
If you haven’t yet read those first 3 posts, we’d suggest you go back and familiarize yourself with them before continuing with today’s article.
Today we’re building on the work we did in Part 3, and learning how to take advantage of the configuration and structure we defined previously in order to model data in Instance 1 that is contained in Instance 2.
1. Calculation views
The first step is to create a calculation view. To do this, follow the usual steps, create a database artifact, and select the ‘Calculation View’ option among the ones available in the list. Leave the standard settings as they are. You will notice that the aggregation and semantics node is automatically created, and you cannot delete it:

As a test for this session, we will create a CV using the table T_CUSTOMERS table from Instance 2. To be able to select Instance 2 tables add a database connection by clicking the “+” button on the project list:

You will be asked to enter the API endpoint (the information is available in the cockpit, and it should be similar to https://api.cf.us10.hana.ondemand.com), as well as the associated email address and password. Once you’ve done so, a new tab will be opened where you can select the desired space from among the previously created ones.
Once the connection is working, add a union node to the calculation view and click the ‘Add Data Source’ button, as shown here:

Then, search for the table located in Instance I2 (remember to select the service just created in the drop-down list) and select ‘Create Synonym’.
2. Creating and configuring a synonym
As an introduction to this section and considering the object’s importance in SAP HANA Cloud, let’s define what a synonym is.
In general terms, a synonym is an alias for a database object. While working with it you can think of it as simply the object that is the target of the synonym. It belongs to its own schema which is typically independent of the schema to which the target database object belongs. For this reason, synonyms are defined if you are referring to an object that is not in the same schema or application container.
Going back to the step by step guide, in the creation wizard enter a suitable name for the synonym, (as a best practice choose a name beginning with an ‘S_’), select ‘Generate .hdbgrants File’, and add the roles created previously:

Open the ‘.hdbgrants’ file and add the other roles needed, paying attention to the comma between role names:
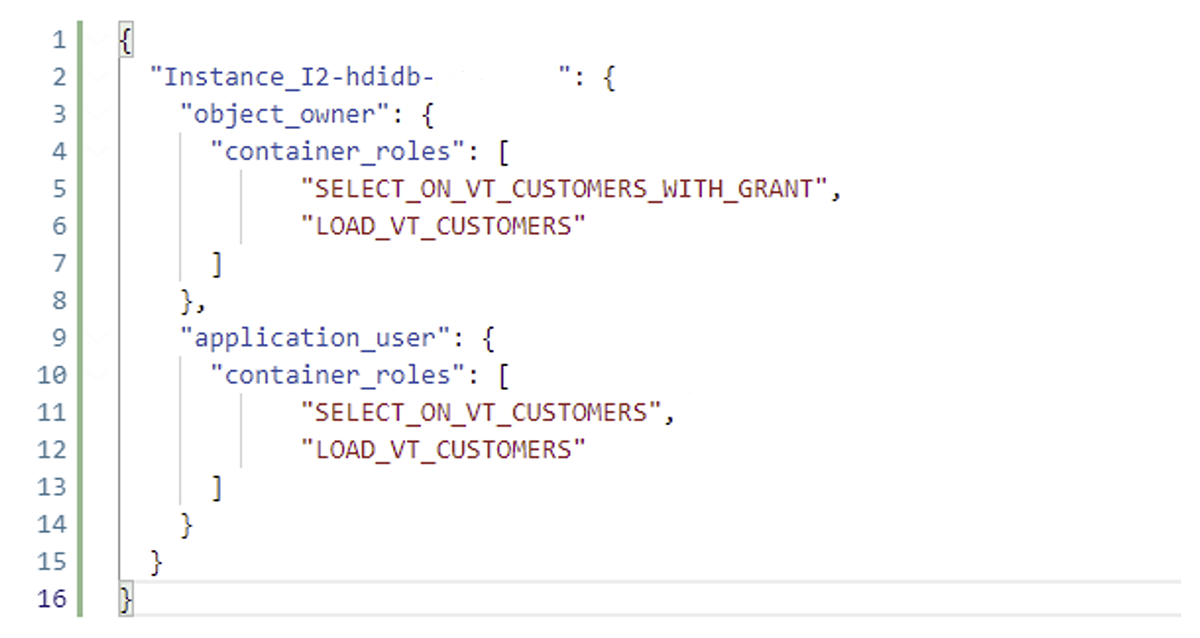
Once this is done, both the object owner and the application user can load and retrieve the data contained in it.
3. Creating and configuring a user-provided service
While we’re talking about loading data, let’s also authorize data loading to other tables. Just to illustrate the other options, as we are not connecting to another container but to a schema or virtual table, let’s create a UPS. We already have created the user we need previously. Follow the usual steps to add a database connection and select ‘Create user-provided service instance’:

Enter the necessary information, and remember to connect to our instance. For the purposes of this article, this is named Instance 1 with user UPS. Note that this was defined by us in the previous blog (Part 3) so double check your UPS definition. Remember to leave the ‘Connect to the database securely’ checkbox marked as SAP HANA Cloud requires this type of connection. Finally, add the connection.
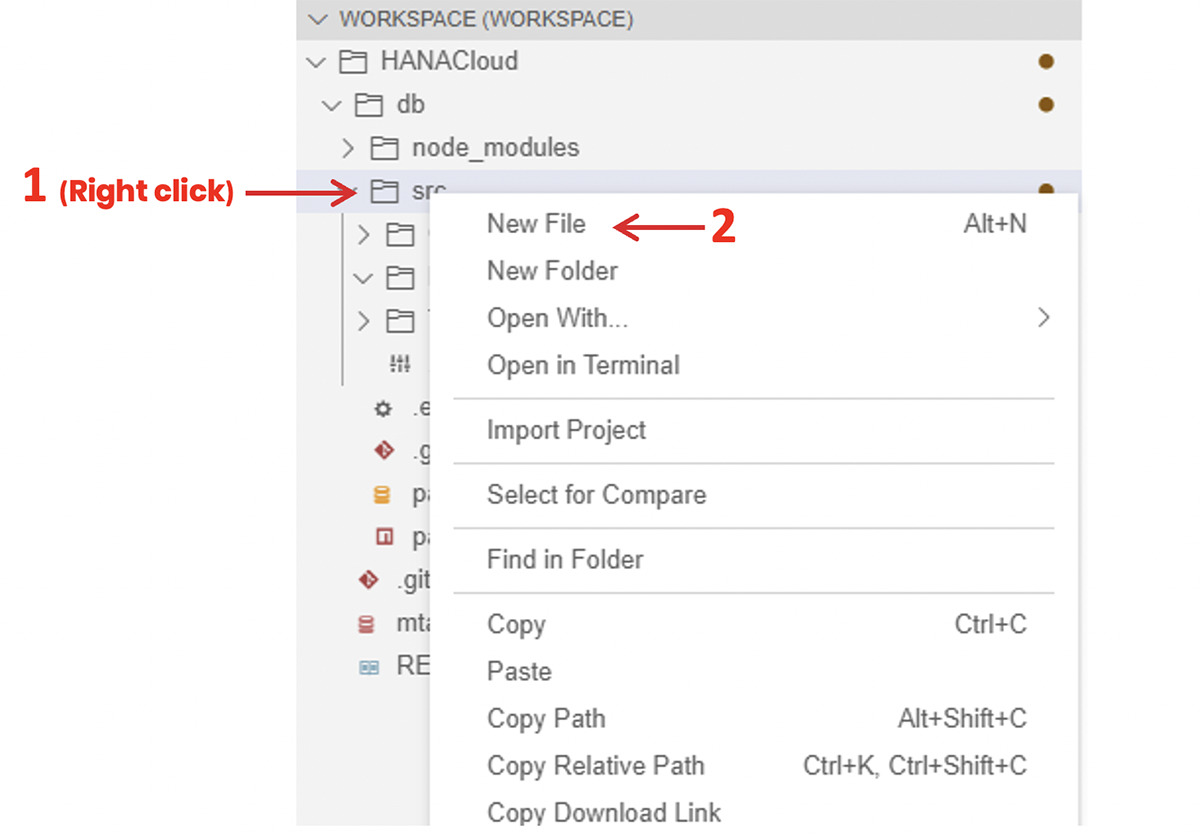
To work with this UPS, we need to assign it roles and privileges, for this purpose, create a ‘.hdbgrants’ file, right-click on the desired destination folder and select the ‘New File’ option:
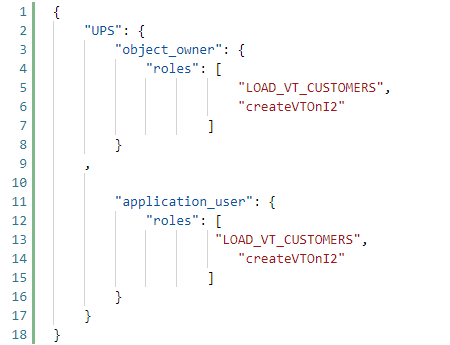
When the menu prompts you to, enter the desired name and the following extension:

As we are performing the same action, but in a different way, we will add similar code to this grant file:
You’ll remember that in the previous blog post (Part 3), we created a virtual table pointing to T_CUSTOMERS from the Database Explorer. With the definition of the roles complete, we can now create it via the UPS as a database artifact.
4. Conclusion
In this article, you’ve learned how to manage data contained in different schemas, projects, etc. in different ways, and you’ve seen how to include data in a Calculation View. Note that the same process would be used with the other database artifacts such as Flowgraphs.
So if you’ve followed the series so far, you should now know how to create and configure an SAP HANA Cloud project to be able to model data from inside and outside your schema and project. Keep an eye on our blog for the next installment in the series—Part 5—where we’ll be exploring strategies for improving your calculation views.