
If you’ve been following the series so far, in Part 1 you will have learned how to create a development environment, synchronise it with GitHub via SSH and create a new database project.
And in Part 2 you’ll have learned how to define table structures and rows, how to import data to the development space using HDI containers, and finally how to set up HDB roles with the appropriate privileges.
If you haven’t yet read those posts, we’d suggest you go back and familiarise yourself with them before working through Part 3.
In this session, you will learn how to create and manage users including the creation of roles, certificates, remote sources, and so on. The steps we will run through in this article are critical before we continue with the series, as it's vital that your configuration is correct in order to work with database artifacts contained in an external instance.
Here’s an overview of the architecture we’ll be using in this session—we’ll execute each of the steps on top of it:
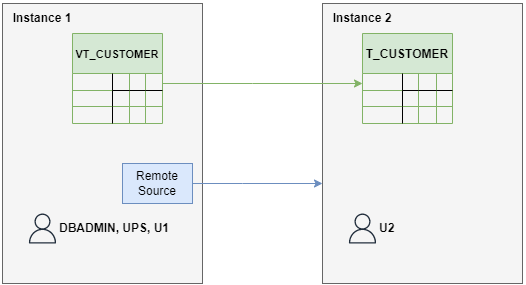
For the purposes of this article, Instance 1 is identical to the instance we created and configured previously—in Parts 1 and 2—and which we will now be connecting to an external instance.
Instance 2 is the external instance where the artifacts we need will be contained. For this article, and for demonstration purposes, the instance only contains one demo table named ‘T_CUSTOMER’.
1. Creating the necessary users and privileges
Go to the SAP HANA Database Explorer for Instance 1 and open an SQL window in it. To do that you can right-click on the database name and select ‘Open SQL Console’:

The following code lines will create 2 new users, choose your own password, and execute it in the SQL console which you have just opened. Before doing this, make sure you are logged in to a user account which has sufficient privileges, otherwise use the CONNECT SQL function:
create user UPS password "<password>" no force_first_password_change set usergroup default;
create user U1 password "<password>" no force_first_password_change set usergroup default;
We’ve called the first user “UPS”, which comes from ‘user provide service’, which we’ll explain later when we use it. The other user, “U1”, will be in charge of the setup. Note that both users have fewer privileges than the admin user “DBADMIN”.
The next step is to grant the necessary privileges to user U1:
grant create schema to U1;
grant create remote source to U1;
grant role admin to U1;
We also need to create a certificate for remote sources, which we do like this:
CREATE PSE FOR_REMOTE_SOURCES;
CREATE CERTIFICATE FROM '-----BEGIN CERTIFICATE-----MIIDrzCCApegAwIBAgIQCDvgVpBCRrGhdWrJWZHHSjANBgkqhkiG9w0BAQUFADBhMQswCQYDVQQGEwJVUzEVMBMGA1UEChMMRGlnaUNlcnQgSW5jMRkwFwYDVQQLExB3d3cuZGlnaWNlcnQuY29tMSAwHgYDVQQDExdEaWdpQ2VydCBHbG9iYWwgUm9vdCBDQTAeFw0wNjExMTAwMDAwMDBaFw0zMTExMTAwMDAwMDBaMGExCzAJBgNVBAYTAlVTMRUwEwYDVQQKEwxEaWdpQ2VydCBJbmMxGTAXBgNVBAsTEHd3dy5kaWdpY2VydC5jb20xIDAeBgNVBAMTF0RpZ2lDZXJ0IEdsb2JhbCBSb290IENBMIIBIjANBgkqhkiG9w0BAQEFAAOCAQ8AMIIBCgKCAQEA4jvhEXLeqKTTo1eqUKKPC3eQyaKl7hLOllsBCSDMAZOnTjC3U/dDxGkAV53ijSLdhwZAAIEJzs4bg7/fzTtxRuLWZscFs3YnFo97nh6Vfe63SKMI2tavegw5BmV/Sl0fvBf4q77uKNd0f3p4mVmFaG5cIzJLv07A6Fpt43C/dxC//AH2hdmoRBBYMql1GNXRor5H4idq9Joz+EkIYIvUX7Q6hL+hqkpMfT7PT19sdl6gSzeRntwi5m3OFBqOasv+zbMUZBfHWymeMr/y7vrTC0LUq7dBMtoM1O/4gdW7jVg/tRvoSSiicNoxBN33shbyTApOB6jtSj1etX+jkMOvJwIDAQABo2MwYTAOBgNVHQ8BAf8EBAMCAYYwDwYDVR0TAQH/BAUwAwEB/zAdBgNVHQ4EFgQUA95QNVbRTLtm8KPiGxvDl7I90VUwHwYDVR0jBBgwFoAUA95QNVbRTLtm8KPiGxvDl7I90VUwDQYJKoZIhvcNAQEFBQADggEBAMucN6pIExIK+t1EnE9SsPTfrgT1eXkIoyQY/EsrhMAtudXH/vTBH1jLuG2cenTnmCmrEbXjcKChzUyImZOMkXDiqw8cvpOp/2PV5Adg06O/nVsJ8dWO41P0jmP6P6fbtGbfYmbW0W5BjfIttep3Sp+dWOIrWcBAI+0tKIJFPnlUkiaY4IBIqDfv8NZ5YBberOgOzW6sRBc4L0na4UU+Krk2U886UAb3LujEV0lsYSEY1QSteDwsOoBrp+uvFRTp2InBuThs4pFsiv9kuXclVzDAGySj4dzp30d8tbQkCAUw7C29C79Fv1C5qfPrmAESrciIxpg0X40KPMbp1ZWVbd4=-----END CERTIFICATE-----'
Next, in order to obtain the certificate ID, we can execute the following:
SELECT * FROM CERTIFICATES;

We then add it to the PSE certificates list. In this step we will be linking the certificate which we just created with the ones available for remote sources:
ALTER PSE FOR_REMOTE_SOURCES ADD CERTIFICATE <certificate ID>;
SET PSE FOR_REMOTE_SOURCES PURPOSE REMOTE SOURCES;
As a quick explanation, PSE contains the public-key certificates belonging to the CAs that the server trusts, so only users who present these certificates can be authenticated.
2. Connecting to the database
What is needed next is to connect to the database with user U1, that is the one we have just created.
Let’s add U1 as a database connection. To do this, right click in the instance name and click ‘Add Database with Different User’. Once the pop-up is shown, enter the credentials used while creating U1 user:

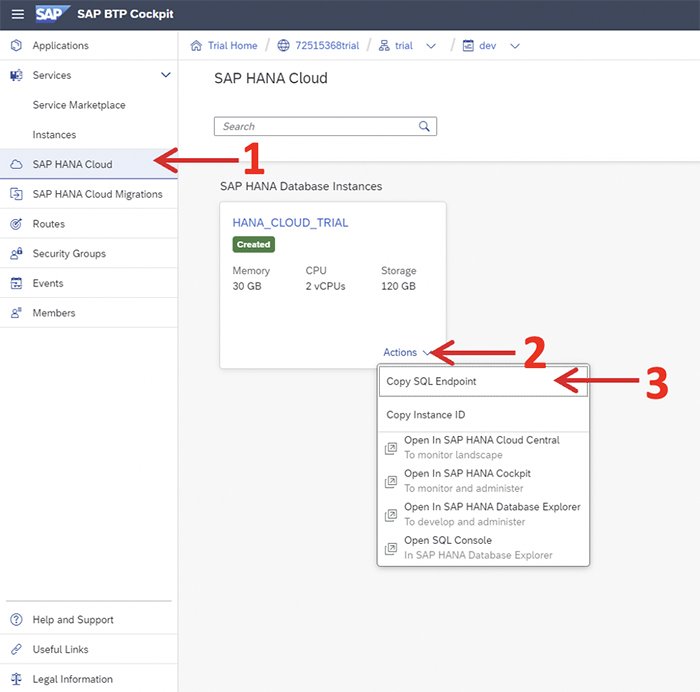
If this option doesn’t appear, we will need to create a new connection manually. The first step is going to the SAP BTP Cockpit and clicking the ‘SAP HANA Cloud’ section on the left panel. Then click on ‘Actions’ and select ‘Copy SQL Endpoint’:
Once the Endpoint is copied to your clipboard, go back to the Database Explorer and click on the “+”button. Select ‘SAP HANA Database’ in the dropdown menu and copy the endpoint in the ‘Host’ section. Note that the endpoint copied finishes with ‘:port_number’, copy the port number on the correct field and erase it from the host section. Finally, enter the username and password for the U1 user you created before and check the ‘Save password’ box:

Then, open an SQL Console with the new user and create the schema VT_DATABASE_I2:
CREATE SCHEMA VT_DATABASE_I2;
3. Creating a Remote Source
Our objective here is to create a virtual table pointing to the database of Instance 2, but first of all, we need to create a remote source. Expand the options under the database we have just created, right click on ‘Remote Source’ and select the ‘Add Remote Source’ option. Enter the necessary information and open the remote source.
With the remote source open, enter the necessary filters and click on ‘Search’. Mark the checkbox of the table, and click on ‘Create Virtual Object(s)’:
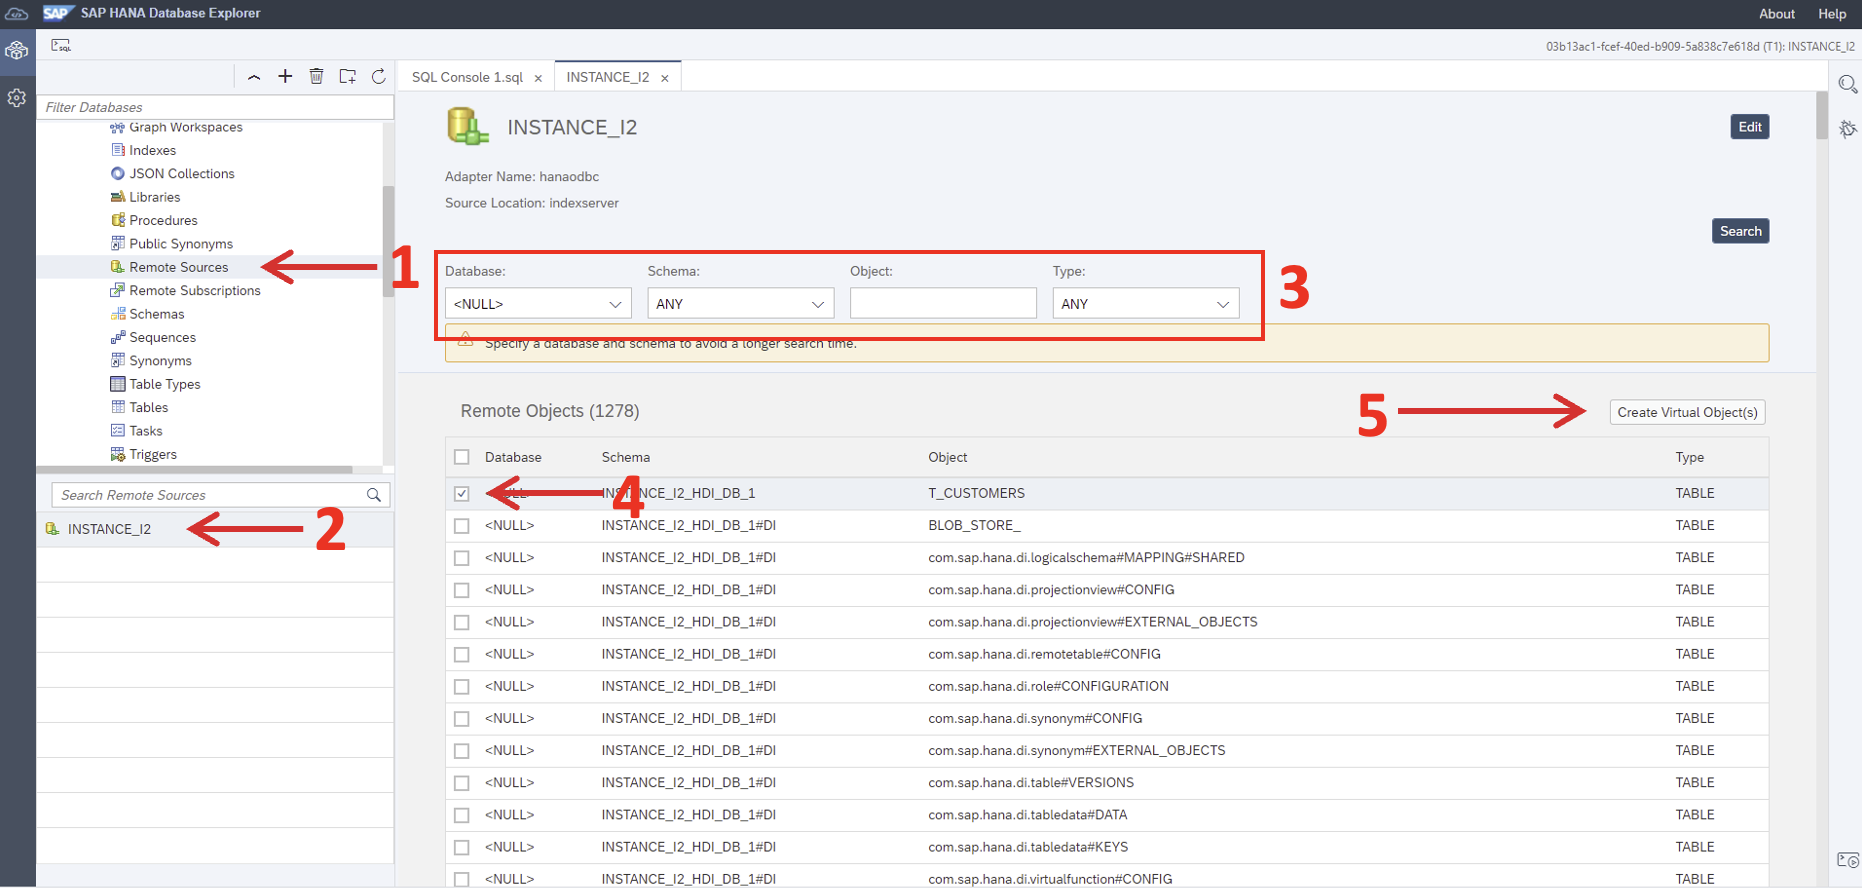
When you click the button labelled Step 5 in the screenshot, a menu will pop up. Here, enter a name and the desired schema where you want to create the virtual table. In our case we’ll use the schema VT_DATABASE_I2 which we created a few steps ago. And in this case the table will be named VT_CUSTOMERS.
4. Managing authorisations
To work with this virtual table, we will need to set up some authorisations. Go back to the SQL console and write the following commands:
First, we define a role ‘LOAD_VT_CUSTOMERS’ that will be able to load data to the table:
create role LOAD_VT_CUSTOMERS;
grant insert, update, delete on VT_DATABASE_I2.VT_CUSTOMERS to LOAD_VT_CUSTOMERS;
grant LOAD_VT_CUSTOMERS to UPS with admin option;
The next role we need to create is ‘SELECT_ON_VT_CUSTOMERS_WITH_GRANT’ which will have Select permissions on the table, allowing us to see the data contained in it:
create role SELECT_ON_VT_CUSTOMERS_WITH_GRANT;
grant select on VT_DATABASE_I2.VT_CUSTOMERS to SELECT_ON_VT_CUSTOMERS_WITH_GRANT with grant option;
grant SELECT_ON_VT_CUSTOMERS_WITH_GRANT to "_SYS_DI#BROKER_CG"._SYS_DI_OO_DEFAULTS;
In the code lines below, we’re defining the same privileges as the previous ones but in this case, they are granted to the application users—not just the object owners:
create role SELECT_ON_VT_CUSTOMERS;
grant select on VT_DATABASE_I2.VT_CUSTOMERS to SELECT_ON_VT_CUSTOMERS;
grant SELECT_ON_VT_CUSTOMERS to BROKER_USER.RT_DEFAULTS;
Finally, we are granting the privilege to create virtual tables to user UPS. As mentioned before, this will be used in a later session:
create role "createVTOnI2";
grant create virtual table on remote source INSTANCE_I2 to "createVTOnI2";
grant "createVTOnI2" to UPS with admin option;
That brings us to the end of this session—we hope you’ve found it both interesting and informative. As we said above, the steps in this part are crucial to the success of the next part, so you may wish to go back and double check your configurations, before you join us for part 4 in the SAP HANA series. In that session we’ll be continuing with the work we’ve done today to complete our guide to building up a Federated Scenario—keep an eye on our blog for the next post.
Previous posts in this series:
SAP HANA Cloud Series Part 1 – How to Set Up the Environment
SAP HANA Cloud Series Part 2 – How to Define Tables and Roles