
If you haven’t read the previous posts in this series, we’d recommend you review them before continuing, as each post builds on the topics covered in the previous one. In Part 1 we covered creating a development environment, in Part 2 we looked at table structures and rows, and in Part 3 and Part 4 we showed how to build federated scenarios.
In this fifth session, we will continue working with calculation views, specifically learning how to improve them for queries that use different techniques, for example, Union Pruning and Static Cache.
For the following exercises, we will use only one instance. But the same techniques can also be developed within the federated scenario we created in the previous blog posts.
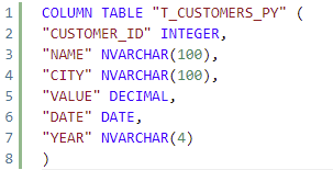
In our workspace, we will have 2 tables, T_CUSTOMERS_CY that contains data from 2022 and T_CUSTOMERS_PY that contains the data from previous years. You can see the definitions below:


1. Calculation View creation
To begin with, our objective is to have all the data in the same calculation view, for that purpose the structure of the calculation view will be constructed as shown here:

We are including the tables involved as a projection and using the union node to obtain all data in a single table. In the union node, you can map the columns one by one, but it is also possible to delegate this task to SAP HANA Cloud using the following option:

NB: Check that the data sources are well defined before using this option.
The next step in this definition is to create a constant to differentiate the different data sources in the output of the U_CUSTOMERS node. To do this, click on the ‘+’ button:

Once you click this button, a configuration menu will be opened. Select a suitable name, NVARCHAR as a datatype and a suitable length. See an example below where the constant value for 2022 is ‘CURRENT’ and for the rest of the years is ‘PREVIOUS’:

This value will be needed later, when we use the Analytic Privilege artifact and will be a crucial aspect of the security of the view.
NB: If you have a large set of data, and you intend to access only a part of it, it is also useful to filter the data you wish to use to improve the performance of the performance.
Now build the calculation view to make sure everything is correctly configured. You can preview the data at this point by right clicking the object in the project workspace and selecting the ‘Data Preview’ option, as shown here:

We can also perform a data preview as an SQL function. In this case, the code you would use would be as shown here:

2. Static Cache
Another technique to minimize the transfer of data that is necessary is to make use of caching. Caching is a technique where you store the data as it is at this moment and if another query comes in and the storage time is still valid, then the data is taken from this intermediate storage.
Caching only makes sense if you have already pre-processed your data, so the idea is to store the data after this pre-processing. For example, if users typically work with just a few columns then it makes sense to define the cache for these columns.
Enabling this option is very simple. In SAP HANA Cloud, go back to Business Application Studio and click on your semantics node. Go to ‘View Properties’ > ‘Static Cache’, select the ‘Enable Cache’ option, and modify the retention period to the desired one. After that define the cache, in this example case, let’s assume that users typically use all columns apart from the current year:

When the configuration is finished, simply build the view again to complete the process.
3. Conclusion
In today's exercises, we’ve covered how to perform a simple data modeling in a calculation view with a union node, and learned how to optimize its performance using the caching technique. All that remains is to ensure that we have secured the data involved, which we’ll cover in our next and final article in this SAP HANA series - Part 6 - so keep an eye on the Clariba blog for further updates.
To finish with that development and as a last step, it is only remaining the security needed on the data contained, check for the following part to learn how to do it.