
On my previous blog, “Installing Data Services 4.0 in a distributed environment” I mentioned there was an important step to be carried out after installing data services in a distributed environment: configure the repositories. As promised, I will now walk you through this process. Data Services 4.0 can now be managed using the BI Platform for security and administration. This puts all of the security for Data Services in one place, instead of being fragmented across the various repositories. It means that Data Services repositories are managed through the Central Management Console. With Data Services 4.0 you will be able to set rights on individual repositories just like you would with any other object in the SAP BusinessObjects platform. What is particularly interesting about managing Data Services security using CMC is that you can assign rights to the different Data services repositories.
Now you can log into Data Services Designer or Management Console with your SAP BusinessObjects user ID instead of needing to enter database credentials. Once you log into Designer, you are presented with a simple list of Data Services repositories to choose from.
I advice anyone who is beginning to experiment with Data Services to use the repositories properly from the start! At first it might seem really tough, but it will prove to be very useful. SAP BusinessObjects Data Services solutions are built over 3 different types of meta-data repositories called central, local and profile repository. In this article I am going to show you how to configure and use the central and the local repository.
The local repositories can be used by the individual ETL developers to store the meta-data pertaining to their ETL codes, the central repository is used to "check in" the individual work and maintain a single version of truth for the configuration items. This “check in” action allows you to have a version history from which you can recover older versions in case you need it.
Now lets see how to configure the local and central repository in order to finish the Data Services’ installation.
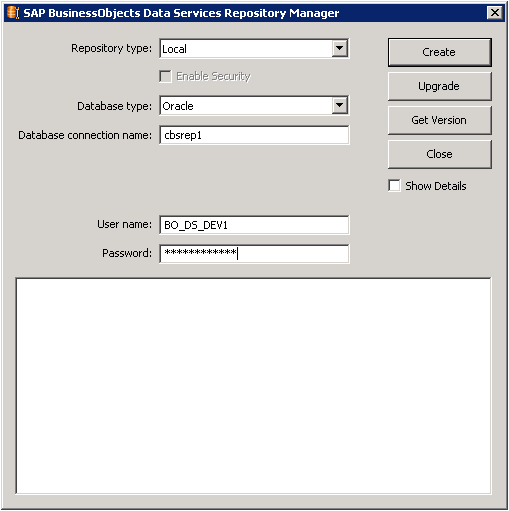
So, let’s start with the local repository. First of all, go to Start Menu and start Data Service Repository Manager Tool.
Choose “Local” in the repository type combo box. Then, enter the information to configure the meta-data of the Local Repository.
For the central repository chose central as repository type and then enter the information to configure the meta-data of the Central Repository. Check the check box “Enable Security”.
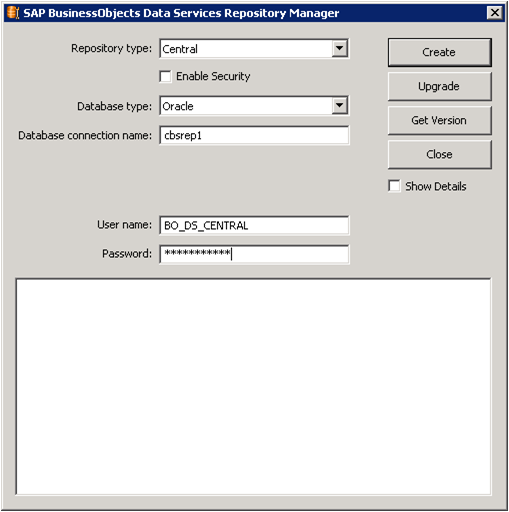
After filling in the information, press Get Version in order to know if there is connection with the data base. If there is connection established, press Create.
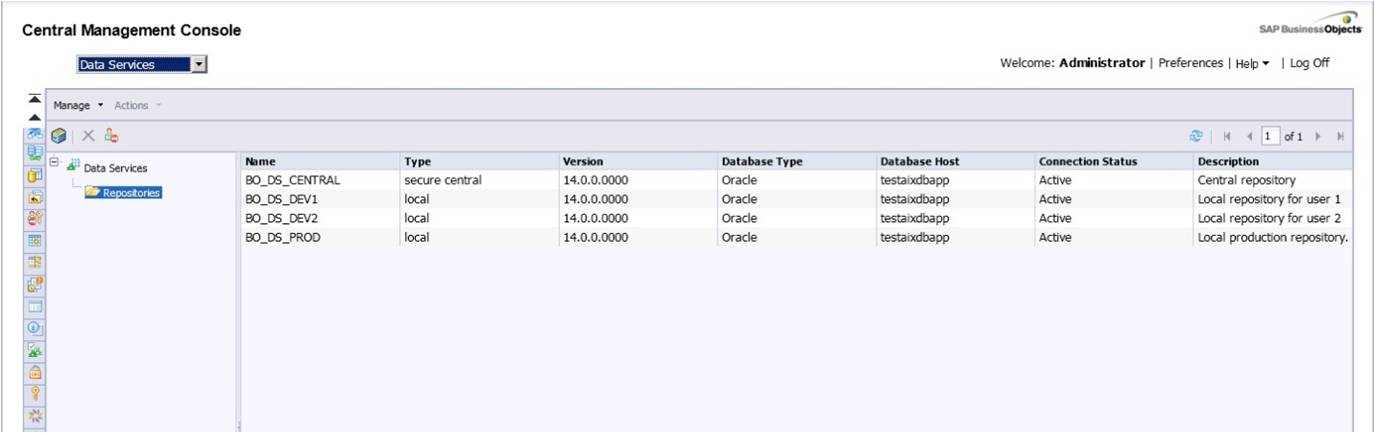
Once you have created the repositories you have to add them into the Data Service Management Console. To do that log in DS Management Console. You will see the screen below.
This error is telling you that you have to register the repositories. The next steps is to click on Administrator to register the repositories.
On the left pane, click on Management list item. Then click on Repositories and you will see that there are no repositories registered on it. In order to register them, click the Add button to register a repository in management console.
Finally, write the repository information and click Test to check the connection. If the connection is successful, click apply and then you will be able to see the following image which contains the repositories that you have created. DO NOT forget to register the central repository.

After that, the next logical step is to try to access Data Services using one of the local repositories. Once inside the Designer, activate the central repository that you have created. Data services will display an error telling you that you do not have enough privileges to activate it.
To be able to active the central repository you have to assign the security. To do that go to Data Services Management Console. In the left pane go to “Central Repository” and click on “users and groups”.

Once you are inside Users and Groups, click “add” and create a new group. When the group is created select it and click on the “users” tab which is on the right of the group tab (see the image below).
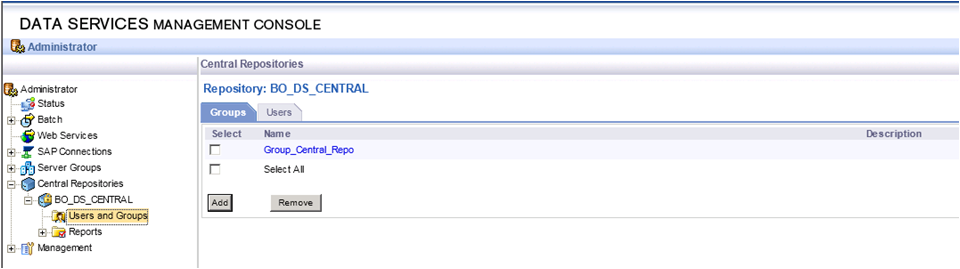
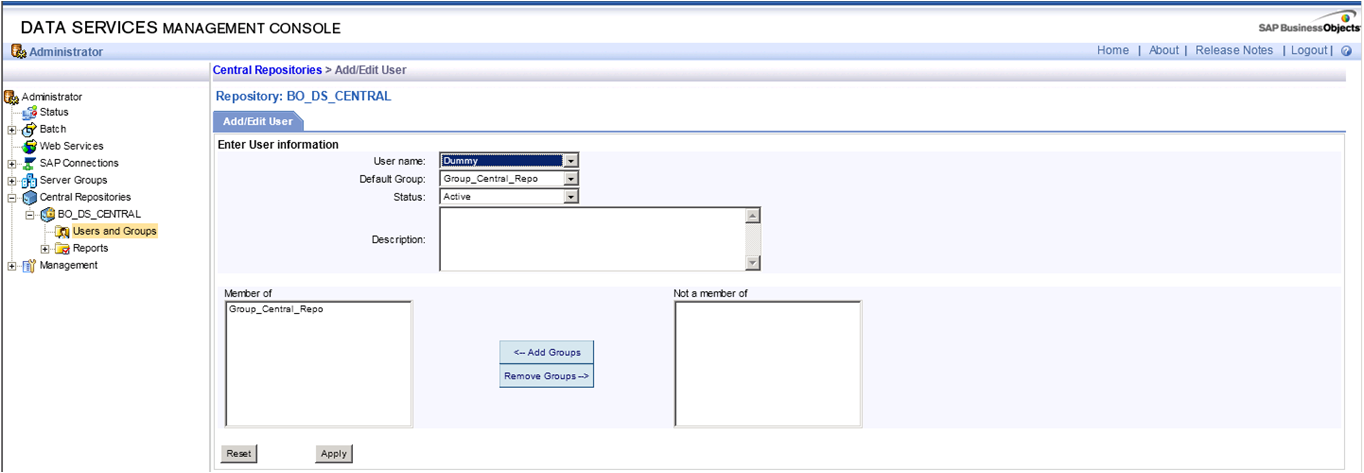
Now you can add the names of the users that can activate and use the central repository in the designer tool. As you can see in the image below the only user that you added in the example is the “Administrator”.
Now the last task is to configure the Job Server to finish the configuration.
As always, go to Start Menu and start Server Manager Tool. Once you start the Server Manager the window below appears.
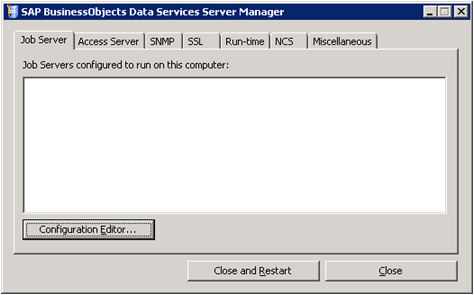
Press Configuration Editor a new window will be opened. Press Add and you will have a new job server.
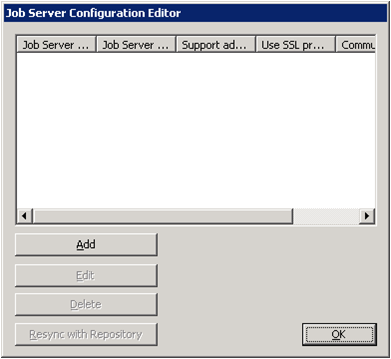
Keep the default port and choose a name or keep the default one for the new Job server. Then press Add to associate the repositories with the job server created.
Once you press “Add” you will be able to add information in the right part of the window “Repository Information”. Add the information of the local repositories that you have created in the previous steps.
At the end you will see two local repositories associated.

With this step you have already finished the repository configuration and are now able to manage the security from the CMC and use the regular BO users to log into the designer and add security to the Data Services repositories like you do with every BusinessObjects application.
If you have any questions or other tips, share it with us by leaving a comment below.