As you may know, when it comes to changing the appearance of a crosstab in Design Studio you need to add some properties in the CSS file. To do so, there are some posts available on the Desing Studio Community Forum that advice on changing the style of the different parts of the crosstab (headers, rows, etc…), but there is not much information about complex changes such as hiding columns or changing column names.
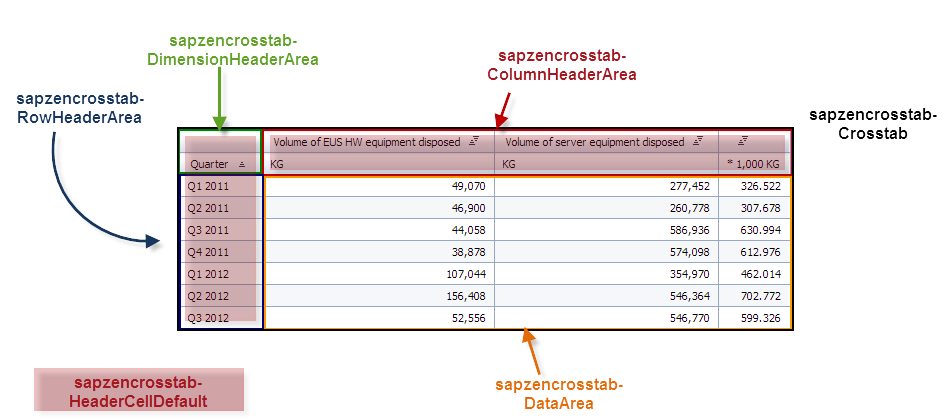
In this blog article, we are going to explain some tricks and tips that we have found in the community and which allowed us to implement new functionalities following the idea of different workarounds. As a reminder, the image bellow shows the structure of the Crosstab component in Design Studio.
The tips we are going to explain here are:
Hiding Dimension Columns
Changing Column Names
Allowing Row Selection without measures
Hiding Dimension Columns
Sometimes we want to hide some columns in order to add new functionalities to the dashboard. For example, when we need a dimension’s value of the selected row but we don’t want to display that dimension in the crosstab, or when the user wants to select which measures to display in the table using input controls.
Following the workaround explained in the post “SAP Design Studio - Showing/Hiding Crosstab Columns with Measures with CSS and Scripting” it is possible to achieve the same purpose but with dimension columns, we only have to add the following line of code in the CSS file:

The class .sapzencrosstab-HeaderRow belongs to each row of the dimension columns and the function nth-child() allows us to select the column we want to modify. In that case, we specify to not display the second dimension column by overwriting the display parameter.

Changing Column Names
This is one of the most in demand features of the developer community, it may be a simple functionality but at the present time it’s only possible to achieve via CSS. Following the workaround of the thread “cross tab – change column name” in the forum of the Design Studio Community it is possible to change the name of any header and any content in the crosstab.
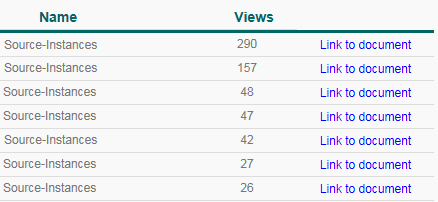
In the next example, we explain how to change the header name of the first measure column.
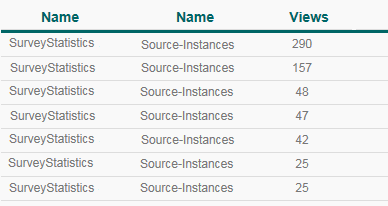
Original table:
Step 1:
First we have to find where the header is placed in the HTML code and the class that references it. Once we find that, we can add the following CSS code:

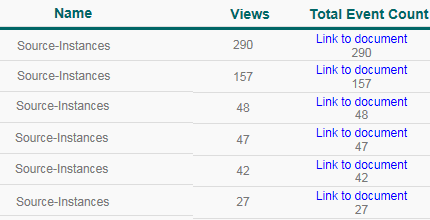
In that case, the class of the header's measure columns is .sapzencrosstab-ColumnHeaderArea and using the function nth-child() we can decide which header we want to modify. What we do here is add “Link to document” before the content of the header. If we want to modify the dimension column headers we have to use the class .sapzencrosstab-DimensionHeaderArea.

Step 2:
To remove the content of the header we have to add the next line of CSS code:

Here we hide the default content of the header and set the height of the cell to zero. That will make the string that we added in the previous step to be displayed as a header.

Allowing Row Selection without measures
The row selection in the Crosstab component is done in the measure area, meaning that if we do not display any measure in the table we are not able to select any member. To solve that limitation, we can use the same workaround explained in the previous point. The solution consists of adding a dummy measure and changing the content of the cell to a text such as “Click here” or “Link”.
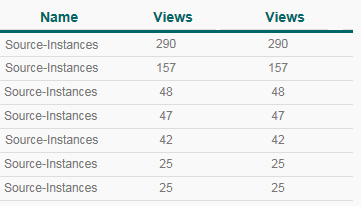
Original table:

Step 1:
First, add a dummy measure in the Crosstab component and add the following CSS code:

As we mentioned, we use the same approach as changing a column name, but in this case we change the CSS class .sapzencrosstab-DataArea and using the function nth-child() we specify that we want to modify the second measure column.
Step 2:
The final step consists of hiding the header of the new added column and hiding the default content of the measure for each row. To achieve that we have to add the following CSS code:

To hide the header of the new added column we take advantage that this column is the last one of the table so we can use the class .sapzencrosstab-HeaderCellLastRow to modify the content.
Benefits
The benefits of the different tips and tricks explained here are the following:
To the developer
Knowing how to implement new functionalities in Design Studio that are not quite well explained in the Design Studio Community allows the developer to reduce time to build a complex dashboard, and avoiding wasted time researching possible workarounds and testing them. Additionally, it offers a great opportunity to impress the client with these new functionalities.
To the end user
The business user does not need to know about the implementation but with the techniques explained here he will enjoy new functionalities that may have been requested, and were previously not possible to achieve.
Links
SAP Design Studio - Showing/Hiding Crosstab Columns with Measures with CSS and Scripting
http://scn.sap.com/community/businessobjects-design-studio/blog/2014/07/28/sap-design-studio--showinghiding-crosstab-columns-with-measures-with-css-and-scripting
SCN thread: “cross tab - change column name”
https://scn.sap.com/thread/3598154
Customize your layout in SAP BusinessObjects Design Studio
http://scn.sap.com/community/businessobjects-design-studio/blog/2013/07/21/design-studio