One of the main hurdles that a Web Intelligence Developer has to overcome is how to deal with data security. Indeed, the search for data security remains the overriding concern for many companies trying to ensure the availability, integrity and confidentiality of the business information, protecting both the database from destructive forces and the unwanted actions or undesired data visualization of unauthorized users. In SAP BusinessObjects we have several ways to set up a security roadmap in terms of authorization data access, but this time I would like to speak about how to use custom security in our WebI documents by using a simple table, joins forced in the Universe Designer and WebI tool in order to show only the data that a user is authorized to see.
We have the following scenario: Imagine that we have a group with different levels of hierarchy in terms of data access levels. The higher you are in the organization more data you have access to. This way, first level within the hierarchy can see all the data, second level in the hierarchy can see his level data and levels below, but won´t have access to first level information, third level can see its own level data and levels below, but won´t have access to second and first level information…and so on.
Let´s now see a step by step approach on how to achieve this
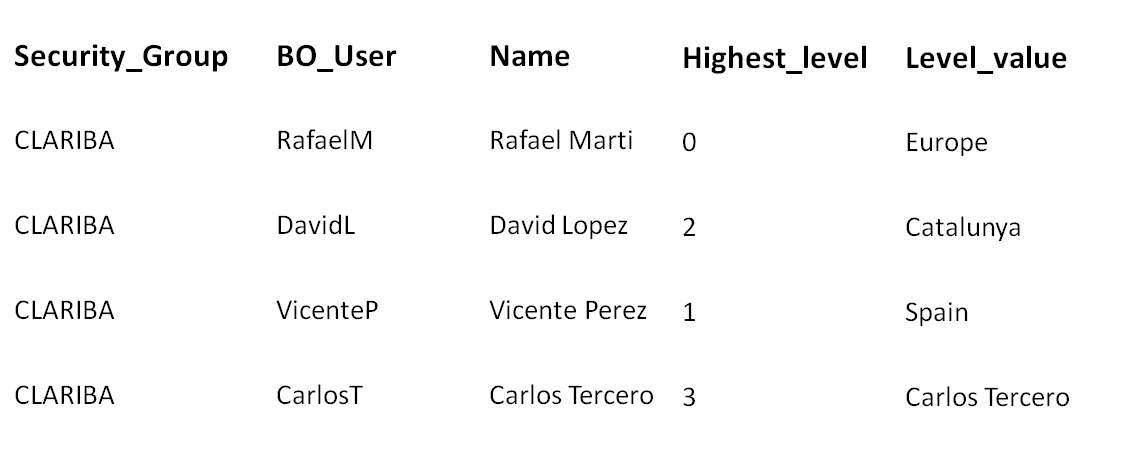
First thing to do is an exercise of defining what the hierarchy structure is, specifying each individual´s level and the date he will therefore have access to. After that, we have to create a table in our data base where we will store groups, users and privileges. Key fields for this purpose are:
BO_User: This will be checked against current users who have accesses to the webi.
Highest Level: Level in the hierarchy where the user belongs to. For this example we will have 4 levels of organization where 0 is the highest level and 3 is the lowest.
Level_value: This will be checked against the fact table.
Once we have the table with all the related data already stored it is time to map it in the SAP BusinessObjects meta layer. For this purpose we have to import the affected universe and create a derived table which will retrieve all the related data for a given user (this means all the data that a user is able to see according to his data access level). The SQL code should be something like below:
SEL BO_User, Level_Organization_3 FROM CLARIBA.SECURITY a
LEFT JOIN
(SEL Level_Organization_0 , Level_Organization_1 , Level_Organization_2 , Level_Organization_3 FROM CLARIBA.FACT_TABLE GROUP BY 1,2,3,4) b
ON (
(Highest_Level=0 AND UPPER (a.level_value) = b.Level_Organization_0) OR (Highest_Level=1 AND UPPER (a.level_value) = b.Level_Organization_1) OR (Highest_Level=2 AND UPPER (a.level_value) = b.Level_Organization_2) OR (Highest_Level=3 AND UPPER (a.level_value) = b.Level_Organization_3) )
WHERE security_group=' CLARIBA'
This particular derived table will create a couple of objects which will be used in the WebI that we want to secure (BO_User and Level_Organization_3).
The third step is to develop and apply the security in the WebI where we want to carry out the data restriction. For this purpose we have to create two new dimensions and one detail. Ensure that your query includes those newly created objects.
First task is discovering which users are trying to access the WebI. We can get their login by creating a new dimension named “BO_User” that contains the following formula:
=CurrentUser()
Once we know who is trying to access WebI, we have to control if the BO_User matches with the User name that we had in our table. We can create a dimension named “FlagBOuser” with the following formula:
=If(Lower([BO_User])=Lower([User Name]);1;0)
Next step is to control what level of data access this BO_user will have. In other words we are applying a kind of row/column level security. For this purpose we create a detail object named “Level_Organization” with the following code:
=If([FlagBOUser]=1;[ Level_Organization_3])
Once we have these infoobjects, the very last step is to drag and drop both FlagBOuser and Level_Organization as global filters at document level. This way we apply the data restriction to each single data block displayed in the report.
The conditions to be applied are simple: “FlagBOuser” must be equal to 1 meaning that a given user we have corresponds to a user in the database table and “Level Organization” is not null, meaning that we have data to be displayed.
At this point of the exercise, we should be able to restrict data contents displayed in the WebI according to a given user that wants to access it.
Last but not the least we can also control some particular cells such as subtotals information by creating a flag that will ensure only the employees that are allowed to are able to see this content.
=If(Lower([BOUser]) InList ("SilviaR";"JoseY”);1;0)
As we have seen in this example, this custom Security in WebI provides an alternative to other types of security that we can apply in our BO system (such as row/level security in Universe Designer). We can achieve a pretty nice data security solution with simplicity, effectiveness and reduced maintenance requirements.
If you have any questions do not hesitate to leave a comment below.