""

Tomcat Upgrade from version 5 to 6 in BOXI 3.x: close the security risk

This post will guide you through the steps on how to successfully make the upgrade of your Tomcat from version 5 to 6 in BOXI 3.x to remove the risk produced by a security hole. The process was done in an environment with Windows Server, SAP BusinessObjects Enterprise XI 3.1 SP3 and Apache Tomcat 5.5. The new Apache Tomcat used was version 6.0.36.

Resolution and steps

All instructions below are using default paths for SAP BusinessObjects and Tomcat 6 installations on a Windows system where the files are put in to “C:Program Files”;  you can change replace these folders with your own ones.

1) Download Tomcat 6.0.x service installer (Where the x is the version that you want).

2) This step is only needed if your SAP BusinessObjects installation does not have the Java JDK installed:

2a) Download the JDK 5.0 Update 22.

2b) Install the JDK 5.0 Update 22 package.

3) Run and install the Tomcat 6.0.x executable. The Welcome screen will appear. Click Next.

4) Click "I Agree" on the License Agreement screen.

5) Select the install type from drop down box & click Next.

6) Enter the destination folder where Tomcat 6 is to be installed. Click Next

7) Enter the user name & password for Administrator login & click Next.

8) Enter the below mentioned path that points to JRE supplied with BOE XI 3.1 (or the JDK in “C:Program FilesJavajdk1.5.0_22” that was installed in step 2). Click Install.

9) Uncheck the "Show Readme" check box. Click Finish.

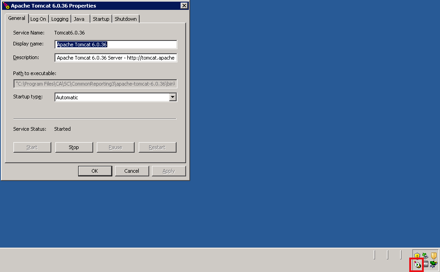
10) Tomcat will now start. There will be a small icon in the system tray as shown below.

Tomcat Icon in the system tray

11) In case that your system is 64bit you can download the Tomcat 6.0.x 64 bit binaries. You need both the tomcat.exe and tomcat6.exe files.

11a) Stop Tomcat and then overwrite your tomcat.exe and tomcat6.exe files in the directory where you installed Tomcat to “C:Program FilesApache Software FoundationTomcat 6.0bin” after backing up the current files.

11b) Start Tomcat service again.

12) Right click on the icon & click Configure.

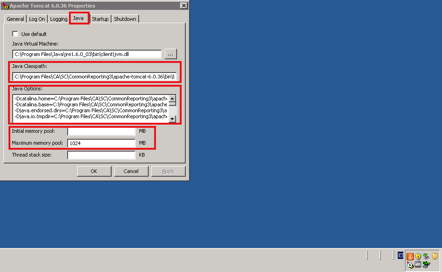
13) The Apache Tomcat Properties screen will appear. Click on Java tab.

Apache Tomcat Properties screen

14) Add the path "C:Program FilesBusiness Objectsjavasdklibtools.jar" in Java Classpath field after the existing entry separated by a semi-colon (;).

15) Add the value 1024 (the value depends on your RAM) in Minimum and Maximum memory pool field.

16) Add the following values in the Java Options field.

-Dbobj.enterprise.home=C:/Program Files/Business Objects/BusinessObjects Enterprise 12.0/ -Xrs -XX:MaxPermSize=512M -Dbusinessobjects.olap.bin= -Dbusinessobjects.olap.stylesheets=C:/Program Files/Business ObjectsOLAP Intelligence 12.0/stylesheets/ -Djava.awt.headless=true -Daf.configdir=C:/Program Files/Business Objects/Dashboard and Analytics 12.0

17) Click on Apply, OK and restart the Tomcat service.

18) Open the file config.tomcat6 in Notepad. It can be located in "C:Program FilesBusiness Objectsdeployment" folder.

19) Uncomment the variable "as_service_name".

20) Assign the following values to the respective variables:

  • as_dir=<installation directory of Tomcat 6>
  • as_instance=localhost
  • as_service_name=Tomcat6

21) The file should look something like this:

##

## Business Objects Configuration Utility

##

# as_dir: the installation directory of the application server

as_dir=C:Program FilesApache Software FoundationTomcat 6.0

# as_instance: the application server instance to deploy to (represents the name of a folder in the conf/Catalina directory)

as_instance=localhost

# as_service_name: on windows, the name of the tomcat service when tomcat is installed as a service

as_service_name=Tomcat6

# as_service_key: on windows, when tomcat is installed as a service, the name of the key where the java startup parameters are stored

# (there is generally no need to touch this)

as_service_key=HKLMSOFTWAREApache Software FoundationProcrun 2.0${as_service_name}ParametersJava

# as_service_key_value: name of the String value where the java startup parameters are stored, in the key pointed to by as_service_key

# (there is generally no need to touch this)

as_service_key_value=Options

22) Save & close the file.

23) Open the file tomcat6.xml in Notepad. It can be located in "C:Program FilesBusiness Objectsdeployment" folder.

24) Make sure that the file has the correct path to the Tomcat6.0.x executable. This path is the one where Apache Tomcat was installed.

<exec dir="${as_dir}/bin" executable="${as_dir}/bin/Tomcat6.0.36.exe" failonerror="false">

25) Assign the right value to the respective variable in case it does not have it.

26) Save & close the file.

27) In the “C:Program FilesApache Software FoundationTomcat 6.0conf” directory create a folder called Catalina. Within the Catalina folder create another folder called localhost

“C:Program FilesApache Software FoundationTomcat 6.0confCatalinalocalhost”

28) Open Command Prompt (Always as Administrator) by clicking Start, Run, type "cmd" and click OK.

29) Change the deployment directory within the SAP BusinessObjects installation path you installed to ("C:Program FilesBusiness Objectsdeployment").

30) Run the command "wdeploy tomcat6 deployall".

31) A BUILD SUCCESSFUL message will appear once deployment of all WAR files is successful. If not, you need to review the failures and correct as needed.

32) Apache Tomcat 6.0.x is now deployed to and configured for usage with SAP BusinessObjects Enterprise XI 3.1 SP3.

33) You can now use the Windows Services management tool or the Tomcat Configuration tool to set Tomcat to automatically start on system boot if you wish.

With this easy guide for the upgrade you should be all set for your installation. We hope that this helps you make a fast transition for your applications by closing the security risk.

If you have any questions or anything to add to help improve this post, please feel free to leave your comments.

Managing ETL dependencies with BusinessObjects Data Services (Part 1)

Are you satisfied with the way you currently manage the dependencies in your ETL? Dependencies between jobs (or parts of jobs) are an important aspect of the ETL management. It pertains to questions like: Do you want to execute job B if job A failed? Imagine that you have a job C with sub-job 1 (usual runtime: 3 hours) and sub-job 2 (usual runtime: 2 minutes). If sub-job 1 was successful and sub-job 2 failed, can you gracefully restart job C without the sub-job 1 being restarted again?

As soon as you have more than 1 simple job, you have to manage your dependencies. In this article (part 1 of a series of articles about ETL Dependencies Management) I’ll first list some of the characteristics I’m looking for in an ideal dependency management system. I will then have a look at some of the possibilities offered by SAP Data Services 4. In part 2 (my next post), I will propose the architecture of a possible dependency management system. In part 3, I will go into the details of the implementation in Data Services. I’ll finish with part 4 by telling you about how the implementation went, and if some improvements are possible.

The ideal dependency management system

In this post I will use the word “process” to design a series of ETL operations that have a meaning together. Example: extract a source table, create a dimension, or update a fact table. The objective here is to manage the dependencies between the processes: updating a fact table should probably only be allowed if updating the corresponding dimensions was successful.

A dependency management system should ideally have at least the following characteristics:

  • Run a process only if its prerequisites ran correctly
  • After a failure, offer the option to re-run all the processes or only the processes which failed
  • Trace the outcome of each process (ran successfully, failed, did not run)
  • Run dependent processes dynamically (rather than statically, i.e. based on date/time)

The possibilities

Let’s enumerate some of the possibilities offered by Data Services, with their respective pros and cons.

1) One job with all processes inside. This is very easy to implement, dynamic in terms of run times, but it doesn’t allow for concurrent runs. Most importantly, it means that failures have to be managed so that the failure of one process does not stop the whole job.

2) One process per job, with jobs scheduled at specific times. This is very easy to implement, allows concurrent runs, but is not dynamic enough. If the process durations increase with the months/years, jobs may overlap.

3) One main job calling other jobs (for example with execution commands or Web Services).

4) One process per job, all the jobs being scheduled at specific times, but checking in a control table if the pre-requisites ran fine. Otherwise they just sleep for some time before checking again.

5) Use the BOE Scheduler to manage jobs based on events (how-to is well described on the SCN). I’ve not tested it yet, but I like this approach.

By default, the first two possibilities only manage the “flow” side of the dependency management (after A, do B). But they do not manage the conditional side of the dependency management (do B only if A was successful). In both cases, a control table updated by SQL scripts would allow the ETL to check if the prerequisite processes have been run correctly.

What I don’t really like in the solutions 2 to 5 is the fact that it’s difficult to have an overview of what’s going on. You cannot really navigate within the whole ETL easily. The solution 1 gives you this overview, but at the cost of having a potentially huge job (without the possibility of processes running concurrently).

Also note that the solutions with multiple jobs will need to manage the initialization of the global variables.

What I miss in all these solutions is an optimal re-start of the ETL. If 10 of my 50 processes failed, and I want to restart these 10 only, do I really have to start them manually?

In my next blog post I’ll propose an architecture that addresses this optimal restart.

Until then, please let me know your thoughts about how you manage your ETL dependencies. Any of the 5 solutions mentioned before? A mix? Something else? And how well does it work for you.

Use Data Services SDK libraries to construct an AWTableMetadata in a Java application

If you have a Java application that returns a table and you are planning to use this as a source of information for SAP Data Services, the best way is to return a table with the same data type as the Data Services Template table “AWTableMetadata”. I will explain how to easily do that in this article.

First you need to go to the libraries folder inside your SAP BusinessObjects installation (…SAP BusinessObjectsData Serviceslib). From this folder we have to import the following libraries to our Eclipse Java project.

  • Acta_Adapter_sdk.jar
  • Acta_broker_client.jar
  • Acta_Tool.jar

The easiest way is to put these libraries inside your Java ext libraries folder so your application will import it automatically. Also if you’re planning to deploy this application on a server you need to place this library inside the server library folder too.

  • ….Javajdk1.7.0jrelibext
  • …..Javajre7libext
  • …..SAP BusinessObjectsTomcat6lib

Import these libraries inside the project:

Import com.acta.metadata.AWAttribute;

Import com.acta.metadata.AWColumn;

Import com.acta.metadata.AWTableMetadata;

Once we have our libraries imported inside our Java project we have to assign the return value for the function in charge of constructing the table as the same data type for the table.

Public static AWTableMetadata createAWTable () throws Exception {…]

Then we are ready to construct our table. To do so we have to:

  1. Declare the table:
    1. AWTableMetadata awTable = new AWTableMetadata () ;
    2. awTable.setTableName("……");
  2. Assign the rows and columns
    1. AWAttribute [] attributes = new AWAttribute [2000] ;
    2. AWColumn [] columns = new AWColumn [2000] ;
  3. Assign the Attributes and columns to our table:
    1. awTable.setColumns(columns);
    2. awTable.setAttributes(attributes);

Finally we have to make the return statement as “return awTable”.

In conclusion, once we have our function done we will be able to communicate and exchange data with data services through our application in this case with a table and be able to use our application as a Data Source.

If you have any doubts or suggestions, please leave a comment below.