
SAP Explorer has become one of the most useful tools in the Business Objects Toolkit, although sometimes we do not appreciate all its potential. If our data set has one or more geographical dimensions, like city, country, state.., we should use the geographical variable types for these dimensions. This kind of dimensions allow us to introduce map analytics in our Exploration Views, which is a plus. Below we will proceed to explain the needed steps in order to set up these dimensions and explain how to better use them. First of all, we need to log on SAP Explorer with an account with permission to "Manage Spaces".
Running SAP BusinessObjects Explorer on top of SAP BW
Running SAP Explorer on top of BW This blog describes the only successfully tested way to run SAP Explorer on top of SAP Netweaver Business Warehouse (SAP BW) info-providers. This is not a straight forward configuration and it requires knowledge of Information Design Tool, Data Federator Administration Tool and SAP Logon application for SAP BW.
Migrating SAP BusinessObjects Explorer spaces to BI4
Scheduling SAP BI Explorer spaces based on events
Users frequently find their explorer spaces and exploration views displaying outdated information. Indeed this can happen if the source data is not ready when the indexing process is scheduled to start at a fixed time, so a manual re-run is needed when the data is available to ensure data freshness. Unfortunately scheduling explorer spaces is not possible in the current 3.x or 4.x versions of SAP BusinessObjects BI, but a workaround has been recently applied in one of our customers which we detail in this article.
Using Google Chrome with SAP BusinessObjects
We all know that there are many internet browsers available, but definitely Google Chrome is one of the most used nowadays and therefore we have had a lot of feedback from our customers related to using chrome with SAP BusinessObjects.
A main problem found by users is that when using Google Chrome on InfoView or BiLaunchPad a missing plug-in error screen appears when you are trying to modify a report and it also shows a HTTP Status 500 error screen when trying to log in to SAP BusinessObjects Explorer. In this blog I will provide a solution these issues.

Issue when login to InfoView or BILaunchPad in GoogleChrome

Issue when accessing SAP BusinessObjects Explorer
The solution we have found is to use a Google Chrome add-on called “IE tab”, which emulates Internet Explorer on Chrome.
Steps to install it:
- From Google Chrome, introduce the link in the url bar and install the add-on. https://chrome.google.com/webstore/detail/hehijbfgiekmjfkfjpbkbammjbdenadd
- Once installed you will see a small folder with the IExplorer logo on the top right corner of google chrome.
Folder with Explorer logo
- Click on the folder and another url bar will appear

URL bar appears
- Introduce the Infoview / BI LaunchPad link in the new bar and start working with it.
Moreover, in case you need to click on an Open Document link and you want Google Chrome to be opened up automatically with it you will need to add your server’s url so it can open successfully, for this you need to follow these steps:
- Right click on the small folder with the IExplorer logo
- Choose Options
- Add the server’s address text in the Auto URL’s field
The outcome
SAP BusinessObjects web based applications can be successfully used with Google Chrome, see below the following examples:
Modifying a report on InfoView

Viewing and managing spaces from SAP BusinessObjects Explorer
Summary
The main benefits of applying these tips are, with the help of Google Chrome:
- Modify documents on Infoview / BILaunchPad
- Log in and manage spaces in SAP BusinessObjects Explorer
- Increase the speed of navigation while going through the platform folders
According to the SAP’s official PAM (Product Availability Matrix), Google Chrome is not entirely supported due to its fast development speed, so the use and frequent update of this add on is highly recommended.
Hope this will help you have a better experience when working with SAP BusinessObjects. If any doubts or suggestions please leave a comment below.
SAP BusinessObjects Explorer 3.2: Creating Row-Level Security
In the past few months I had the chance to implement a solution based on the combination of SAP BusinessObjects Explorer and mobile devices. The challenge was: “I want to explore the same information that I see on my dashboards with SAP BusinessObjects Explorer on my iPad. In this particular case, some of the customer`s dashboards were really complex and we had to deal with many issues. Today I would like to share with you how we solved one of these issues:
How to implement row-level security into a space of Explorer?
The solution to this challenge cannot be based in any case of security implemented at universe level, in SAP BO Explorer the information of the spaces is retrieved when we index the space, this means that any kind of security applied at universe level will have a direct impact when we index the space. What we needed was a space with all the information but able to be filtered on demand based in some personalization rules.
With SAP BO Explorer 3.2 we are able to generate and apply this kind of security by creating two spaces: one reference space with all the possible information to explore and one personalized, where we will be able to filter the information displayed on demand based on the rules of personalization and making use of the reference space.
Definition of the scenario
To be able to follow the implementation of the solution, assume that we start from:
- SAP BusinessObjects XI 3.1 installed and fully operational
- SAP BusinessObjects Explorer 3.2 installed and fully operational
To make it easy to follow I will make use of the eFashion universe and we will need to create users in BO according with the list of values of Name of Manager dimension (Store -> Store Details->Name of manager).Note that the name of the users should be exactly the same as the values of the dimension.
We will create a new space based on the eFashion universe information. The personalization rule is that the Store managers will have access to the space but they will only be able to see the information related to their Store(s).
Creating the e-Fashion Reference space
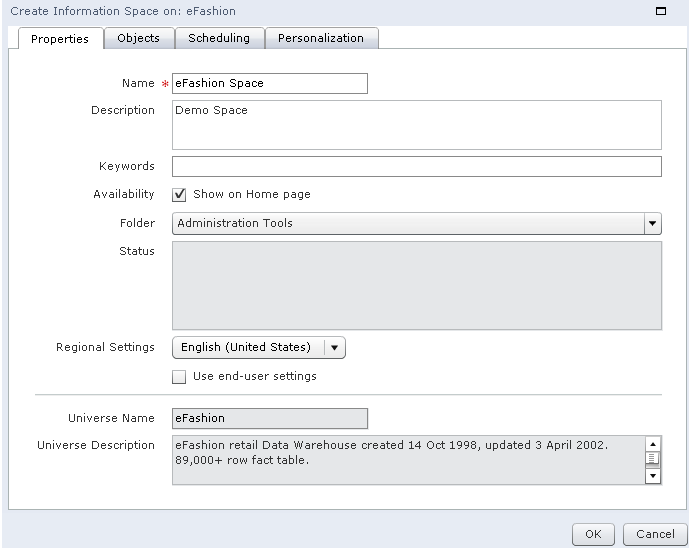
First open SAP BO Explorer and login with administrator credentials. Click in Manage Spaces, select e-Fashion Universe and press New

In the tab Properties introduce a Name, in our case eFashion Ref, and select a folder under Public Folders, for the example Public Folders -> Explorer Spaces

The users should not be able to access this space, so remember to uncheck the option Show on Home Page

In the tab Objects select the objects that we will use in the space, in the example this tab will look like this

Then click Validate the space and then OK to save the space
Now you will have to Index the space, to do this just press the Index button Once the status check shows the following symbol the space is successfully indexed.
Creating e-Fashion Personalized Space
Now we will implement the space to be accessed by the users, in this space we will make use of the eFashion Reference space created before to build a space with the personalization rules defined.
Log in with Administration rights into SAP BO Explorer, go to Manage Spaces, select the eFashion universe and press New. In the tab Properties introduce a Name, in our case eFashion Pers, and select a folder under Public Folder, for the example Public Folder -> Explorer Spaces

Select the same objects that we have used to create the eFashion Ref space

Go to tab Personalization, check Personalize information space Exploration and Select the eFashion Ref space from the list Select an information space

Now select User, from the table To Filter, and select Name of the Manager in the drop-down list in the column Filtered By.

We will link the rest of the dimensions of the personalized space with their corresponding ones on the reference space. The Personalization tab should finally look like this:

Validate the space and press Ok to save it and Index the new space eFashion Pers

Security Topics
Before testing the solution, and to avoid strange behaviors of the SAP BO Explorer spaces, we will have to review the security applied to the different components involved in SAP BusinessObjects. To “make our lives easier” I suggest creating a User Group (i.e. Explorer Users) in SAP BO and I strongly recommend reviewing this list of topics to ensure that the group has:
- Granted access to Explorer application
- Granted access to the Universe
- Granted access to the Connection used on the universe
- Granted access to the folder where the spaces will be stored.
In this example, what I did was to grant View On Demand access to all of the items of the list.
Finally the solution is ready to test!
Testing the solution
Log on in SAP BO Explorer with one of the users we have created, i.e. Quinn, from the Home tab we will access the eFashion Pers space and see only the data belonging to manager Quinn

If you log on with another user created, i.e. Steve, from the Home tab we will access the eFashion Pers space and see only the data that belongs to Steve

I hope you found this article interesting. For any queries regarding the contents of this article please leave a comment and I will readily reply.
SAP BusinessObjects Mobility Solutions (Part 1 - SAP Explorer)
As you might have already noticed we live in a mobile world. The increasing use of mobile devices for everyday tasks has become a common place in the course of the last decade. Business Intelligence has not fallen behind on this trend. On this series of two blog posts on SAP Business Objects Mobility Solutions, we will analyze mobile applications that SAP Business Objects has made available to bring BI to mobile devices (more specifically the Ipad): SAP Explorer and SAP BI Mobile.
Through this analysis we will learn what is the process to install the applications and review a few important things we need to consider. We will focus only on their mobility piece (Explorer for example can also be accessed on non-mobile devices) and we will also review some details of server side installation for each tool.
Both of these tools can be downloaded through SAP Marketplace (if you are an SAP partner).
If you are not an SAP partner but still feel like trying out these tools you can download the mobile applications from the app store and try out the demo servers SAP has made available.
First off, let us give you some details on our test environment and the software that was installed in it.
Software:
Business Objects XI 3.1 SP3 Enterprise
SQL Server 2005
SAP Explorer 3.2
BI Mobile 3.1 SP4
Hardware (Virtual Machine):
Windows Server 2003
4GB RAM
2 processors
30 GB hard drive
With the above setup ready let’s start with our first Mobile tool from SAP Business Objects.
SAP Explorer
This is the first SAP tool based on in-memory technology. It is aimed for casual users who require an agile and pre-built framework for reporting but that still allows them to filter and search data intuitively. It was initially released as a web application only but the mentioned characteristics make it an obvious candidate for mobile devices, so the mobile application came out shortly after.
Once you have the installer files downloaded from SAP Marketplace it is time to install it on our Business Objects environment.
Installation
The installation of SAP Explorer is pretty straightforward. You will find that there are very few screens that we need to pay full attention to and these are the ones we will focus on during this post.
You would install the application and web server components together or separated, depending on your system configuration. In our example we will install the whole product on a single machine.

For environments where the web server is not located on the same machine you will have to install independently the Web Application Server Component in the list above. However, it is also possible to install, for example, the indexing server on a separate machine to optimize efficiency. The index server is the one in charge of generating the space and might require a heavy load of processing power depending on your configuration.
Administrator credentials will be required during installation, so make sure you have them handy, as well as CMS name and port.
Finally the node name will be requested. This is used to identify the installation in multiple/parallel Explorer setup. For example, to link an isolated indexing server to its Master server. In our case we will leave the node name with the default name (which on this case is the computer name) as all of our installation resides on the same place.
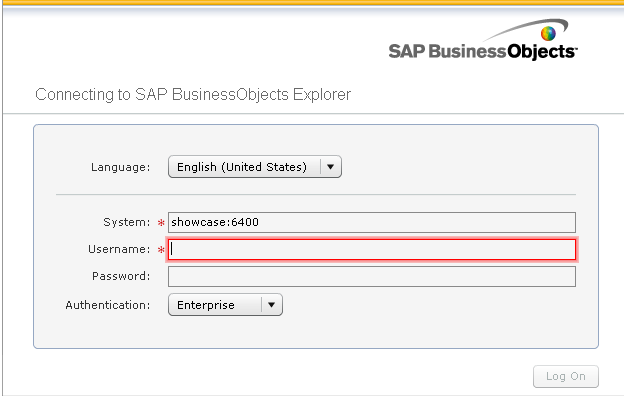
Once the installation is complete we can test it by accessing the following url: http://yourserver:8080/polestar
If everything is setup correctly you will see the login screen for Explorer.
NOTE: If you would like to review the installation process in more detail it is best to review the Installation Guide also available in the SAP Marketplace.
Creating and Configuring a Space
Next step is to create a space. The space is the indexed data that Explorer builds based on a Universe or File. To build it we will need to do the following:
Login to SAP explorer
Click on the Manage Spaces option
Select a universe
Select New

Provide the necessary information to build the space. We will need to provide at least:
Space name
Storage location
The dimensions and facts that will be computed on the space
Once the space has been configured we now need to index it. This process can be executed on demand or it can be scheduled, as a one time only or recurrent event. Depending on the size of the data selected from your universe this process might take from minutes to hours, so be aware of this before long running queries are configured to build a space. Once the space has finished indexing its data it will be marked with a green check.
Now we can plugin our mobile device to the space!
The Mobile Application
Before we plugin your device, first we need to download the application from the app store. We will find it under the name "SAP Explorer".
Once downloaded we need to configure a new connection with the following details:
Connection Name
CMS System name
Username (with permissions to use Explorer)
Password
Type of Authentication
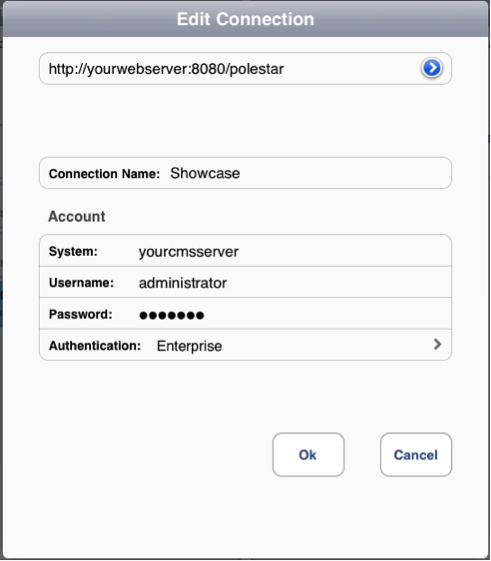
There are no complex requirements on this configuration screen. Just make sure you provide the correct data for each component (web server, cms, cms port, etc).
NOTE: the official SAP Explorer Mobile installation guide specifies that installing SAP BI Mobile servers is a requirement. In reality, this is only optional and by installing SAP Explorer server you should be able to access Explorer with your mobile device.
You should now be able to start the connection to the Explorer server and work with the space created before. On this example we will use the SAP Experience connection that comes configured by default on the Ipad application.
If the connection is successful you should find the following screen listing all available spaces:
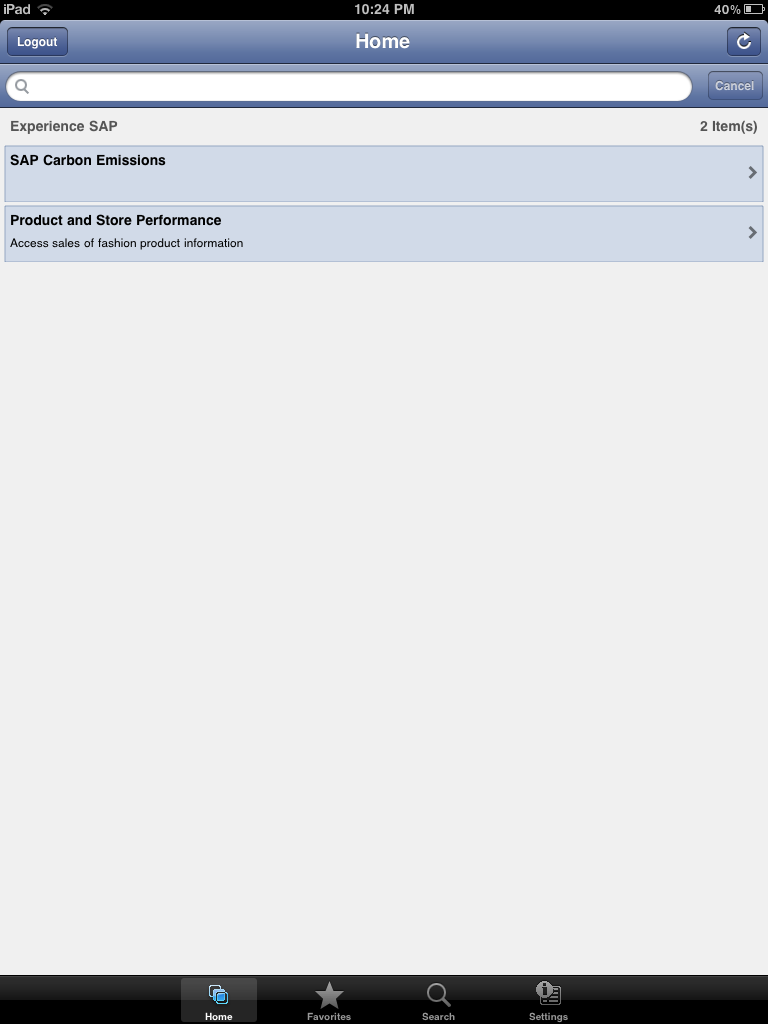
Once a space is selected from the list we would face a screen that looks pretty similar to what you have seen in the web version of Explorer.

The mobile version of SAP Explorer has no differences on functionalities against is Web-based version and only minor changes have been done to adapt for touch interaction on the Ipad.
As you have seen, installing and preparing SAP Explorer Mobile is a no-brainer. Run through the installation process and you are setup to start using spaces and in-memory analysis on the Ipad.
As of now there are no other apps released by SAP for other mobile platforms (i.e. Android). Some might say this is not necessary due to other platforms support of flash technology, but the responsiveness of the Ipad application definitely sets this version appart. We hope to see dedicate applications to come out for other mobile devices soon.
The next mobile application - SAP BI Mobile - will be covered in the next article of the series, that should be out in early January.
If you are interested or have worked with this application, or if you feel it might be useful in your organization, please leave a comment below.