Are you satisfied with the way you currently manage the dependencies in your ETL? In Part 1 of this series, I talked about the features I expect from a dependency management system, and what are the main possibilities offered (directly or indirectly) by Data Services. In Part 2, I proposed an architecture (structure and expected behavior) for a dependency management system inside Data Services. Now I will give you the implementation details, while a feedback on how it went “in real life” as well as possible improvements will come in part 4. So how do we implement this theoretical solution in Data Services?
Let’s start with creating the needed tables (syntax below is for Oracle, things might be slightly different for your DBMS).
Create Table FLOW_DEPENDENCIES (
FLOW_NAME VARCHAR2(100) not Null,
PREREQUISITE VARCHAR2(100)
not Null
,
Constraint FLOW_DEP_PK Primary Key (FLOW_NAME, PREREQUISITE) Enable);
Create Table
FLOW_STATUS (
JOB_KEY NUMBER(28, 0)
not Null
,
FLOW_NAME VARCHAR2(100)
not Null
,
STATUS VARCHAR2(50)
not Null
,
Constraint FLOW_STATUS_PK Primary Key (JOB_KEY, FLOW_NAME) Enable);
Now what about the Data Services part? Assuming that we want to upgrade an existing ETL, we want the practical solution to be as quick as possible to implement, and to allow an easy maintenance. It implies that components should be as standardized as possible, with minimal to zero customization for each flow.
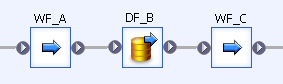
Let’s imagine the case where we have 3 flows (Work flows WF_A and WF_C, Data flow DF_B) that perform a series of operations, for example the update of the account dimension. They have the same prerequisites and can be considered as one unique flow (for the needs of our dependency management system).
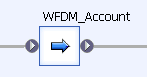
Workflows
We’re going to create a workflow for managing the dependencies of these 3 flows. We will name it WFDM_Account (for Work flow Dependency Management – Account dimension).
ETL Dependencies
Inside, we’ll put a conditional object which will execute the flow only if needed.

Content of WFDM Account
Before we get into the details of the script, it’s time we think about the variables we’ll need:
$G_Job_Key is the unique identifier for this specific job. We assume it has been generated earlier in the job.
$G_Previous_Job_Key is the unique identifier of a previous job. It’s set manually, and only in case we want to re-start the ETL and execute just the flows which failed or did not run. In the example from the part 2 of this article, we would have run the ETL for the second time by setting $G_Previous_Job_Key = 1 (the Job key of the first run).
In order to make the script easier, I’ll use four custom functions. The names and purpose are below, the code will come later.
Check_Flow($P_Flow_Name) is the main function. It returns "Yes" if the flow is allowed to run. Otherwise it returns "No" and inserts a row with the corresponding reason in the table FLOW_STATUS.
Get_Flow_Status($P_Job_Key, $P_Flow_Name) returns the status for a given flow and a given job key.
Insert_Flow_Status($P_Job_Key, $P_Flow_Name, $P_Status) inserts a new status row for a given flow and a given job key.
Is_Prerequisite_OK($P_Job_Key, $P_Flow_Name) returns “No” if any prerequisite of a given flow for a given job run is missing, “Yes” otherwise.
Below is the code of the function Check_Flow($P_Flow_Name)
If (($G_Previous_Job_Key is not Null) and (Get_Flow_Status($G_Previous_Job_Key, $P_Flow_Name) in ('Success', 'Already run')))
Begin
Insert_Flow_Status($G_Job_Key, $P_Flow_Name, 'Already run');
Return 'No';
End
Else
begin
If (Is_Prerequisite_OK($G_Job_Key, $P_Flow_Name) = 'No')
begin
Insert_Flow_Status($G_Job_Key, $P_Flow_Name, 'Missing Prerequisite');
Return 'No';
end
Else Return 'Yes';
End
The two functions Get_Flow_Status and Insert_Flow_Status are easy ones:
Get_Flow_Status($P_Job_Key, $P_Flow_Name):
If ($P_Job_Key is not null)
Return sql('Datawarehouse', 'select STATUS from FLOW_STATUS where JOB_KEY = [$P_Job_Key] and FLOW_NAME = ');
Else
Return Null;
Insert_Flow_Status($P_Job_Key, $P_Flow_Name, $P_Status):
Sql('Datawarehouse', 'insert into FLOW_STATUS values ([$P_Job_Key], , ');
Return 0;
The function Is_Prerequisite_OK($P_Job_Key, $P_Flow_Name) is a bit more complicated because of the join. It compares the number of rows in the table FLOW_STATUS which have a "Success"/"Already run" status with the number of rows from the table FLOW_DEPENDENCIES.
If
(sql('Datawarehouse', '
select count(*)
from FLOW_DEPENDENCIES D
join FLOW_STATUS S
on D.PREREQUISITE = S.FLOW_NAME
where S.JOB_KEY = [$P_Job_Key]
and S.STATUS in ('Success', 'Already run')
and D.FLOW_NAME = ')
=
(sql('Datawarehouse', '
select count(*)
from FLOW_DEPENDENCIES
where FLOW_NAME = ')))
Return 'Yes';
Else Return 'No';
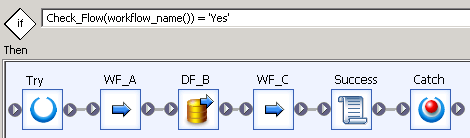
We can now have a look at the content of the conditional object Run_flow.
The if condition checks if the current workflow is allowed to run. If that's not the case, we don’t need to do anything, so the “Else” part of the object is empty. But if the workflow is allowed to run, then we run it (here WF_A, DF_B and WF_C). In order to update the FLOW_STATUS table in case of success, we use a script “Success” which simply inserts a status line:
Insert_Flow_Status($G_Job_Key, workflow_name(), 'Success');
And in order to update the FLOW_STATUS table in case of failure, we use a try-catch structure with a simple script in the Catch object:
Insert_Flow_Status($G_Job_Key, workflow_name(), 'Failure');
Try-catch structure
That's it! Once you've tested that, I would recommend you to replicate the parent flow, rename it to WFDM_Template. You can now replicate the template as many times as needed and simply insert the needed work flows and data flows.
The last step to really make the dependencies work is of course to insert all the flow/prerequisite couples in the table FLOW_DEPENDENCIES. They will be based on the names of the work flows replicated from WFDM_Template.
In the last part of this article, I'll give you a feedback on how it was implemented in a customer project, as well as possible improvements. Until then, I’m looking forward to your opinion on this solution. Does it look good? Do you have another solution? Leave a comment below.